During Week 11, I completed the red enemy layer of the level as well as introduced a screen overlay.
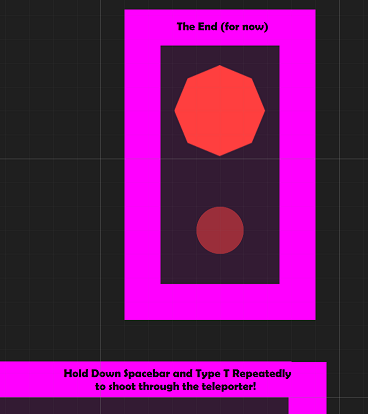
Figure 1: End (Teleport Area) of Red Enemy Layer in my Project in Unity.
First, off I worked on the far right side of the red enemy layer, past the three big green enemies. I wanted to introduce an interesting mechanic, the ability to teleport shooting. The idea is the enemy will move toward the player and cover the teleport zone. Then it’s a case of holding down spacebar and firing with T. Logically, you’d probably be pressing them simultaneously, but that’d make the code a bit more awkward to detect the correct response. Since I had the teleport set to pressing down T, I just added the extra condition like so:
                if (Input.GetKey(KeyCode.Space))
                {
                    attackScript.Fire("Player", playerScript.runSpeed * 5, playerScript.activeColor, teleporterLocation - transform.position, Quaternion.identity, 0.3f, 1);
                    return;
                }
                else
                {
                    transform.position = teleporterLocation;
                }
Figure 2: Teleport Shooting Code.
The code prior to this was just transform.position = teleporterLocation; so it was a case of surrounding this statement with this alternative, and triggering the fire method in the AttackScript. One thing to note is the player position had to be substracted (transform.position) to nullify things because the formula in the attack script adds the player position.
Figure 3: Teleporter Shooting in the Green Teleporter.
Even though the red teleporter forces you to use the mechanic, the green teleporter is actually a better demonstration because it has more space around it.
Next, I worked on implementing a checkpoint for the start of the red enemy layer. I just wanted a different button combination to allow you to restart at the new location. After a lot of trying, I learnt that the scripts would all just reload when reloading the scene, so I settled for pressing down a key at the very start of the level, giving a second to press it. If the player missed that second, they could just restart again, so it wouldn’t be much trouble.
void Update()
{
    if (Input.GetKey(KeyCode.Alpha2) && Time.time < (restartTime + 1f))
    {
        player.transform.position = new Vector2(-16f, 25f);
        playerScript.colorChange = new Dictionary<Color, Color>
        {
            { playerScript.colorWhite, playerScript.colorGreen },
            { playerScript.colorGreen, playerScript.colorWhite },
        };
        playerScript.hasAbility["GreenWall"] = true;
        playerScript.hasAbility["GreenTeleport"] = true;
        playerScript.greenTeleporter1.SetActive(true);
        playerScript.greenTeleporter2.SetActive(true);
        playerScript.greenTeleporter1.GetComponent<SpriteRenderer>().enabled = true;
        playerScript.greenTeleporter2.GetComponent<SpriteRenderer>().enabled = false;
        whiteTeleporter1.GetComponent<SpriteRenderer>().enabled = true;
        whiteTeleporter2.GetComponent<SpriteRenderer>().enabled = false;
    }
    else if (Input.GetKeyDown(KeyCode.P))
    {
        Restart();
    }
}
Figure 4: Player Checkpoint Script
I constructed this code, most of it just reloading the data I want, and the main things being the keycode check and the teleporting to the start of the red layer. restartTime is initalized in the start event.
After this, I worked on the blocking mechanic. I thought through different ways it could work, including increasing/darkness brightness, but I came to the conclusion the most effective way would be a rotation in the z-axis (constraining to the x-y plane). Because both player and enemy are pointy shapes, it gives a nice circular-saw-like effect with a fast rotation.
Figure 5: Blocking demonstration in my Unity project.
The logic was fairly straightforward, it was just a case of tweaking the time the block and the rotation was active for. While the block (boolean) was on, the player or enemy couldn’t take damage. I also made a timer count down, which at a certain point, would turn the block off; but it would also count down until the next availability of the block. Red Enemies and Blue Enemies would just use the block whenever they can, while Green Enemies couldn’t use it at all. The only problem I really had is that I checked for the inverse boolean by mistake in the player/enemy damage code. Once I realized what I had done, it worked as expected.
private float blockWait;
public bool blockOn;
private GameObject player;
private PlayerScript playerScript;
private EnemyScript enemyScript;
private float rotationSpeed = 1800f;

void Start()
{
    blockWait = 0f;
    blockOn = false;
    player = GameObject.Find("Player");
    playerScript = player.GetComponent<PlayerScript>();
    if (gameObject != player)
    {
        enemyScript = GetComponent<EnemyScript>();
    }
}

void Update()
{
    if (Input.GetKeyDown(KeyCode.Q) && gameObject.CompareTag("Player"))
    {
        if (blockWait <= 0f)
        {
            blockWait = 4f;
            blockOn = true;
        }
        else
        {
            StartCoroutine(playerScript.Flicker(player));
        }
    }
    if (playerScript.activeColor != playerScript.colorWhite && gameObject.CompareTag("Enemy") && enemyScript.runSpeed != 2f &&  blockWait <= 0f)
    {
        blockWait = 4f;
        blockOn = true;
    }
    if (blockWait > 0f)
    {
        blockWait -= Time.deltaTime;
        if (blockWait < 2f)
        {
            blockOn = false;
        }
    }
    if (blockOn)
    {
        transform.Rotate(0f, 0f, rotationSpeed * Time.deltaTime);
    }
}
Figure 6: Block script.
The final thing I developed this week was the long-awaited health and points overlay. I went back to try and figure out what to do. Luckily, I actually worked out what to do in not much time. I set an image as a child object of the canvas object and realized if I varied the position and size for the rect transform, it did actually cover the screen where I wanted when I went into play mode. The overlay didn’t look nice opaque, so I made it black but with a decent amount of transparency, close in colour to the dark floor.
For the text object, I just copied the position and dimensions that I had with the image. It seemed to work great, now I could start with whatever text I wanted. But I also wanted to edit it as updates happen throughout the game: when an enemy is defeated, when an ability is collected and when consuming health.
This information from the Unity Answers forum helped me. I needed to include UnityEngine.UI and get the Text component. Then I could just make a method to fill the text with whatever I wanted.
public void UpdateOverlay()
{
string healthText = "      Health: ";
    int health = 5 - deathCounter;
    for (int i = 0; i < health; i++)
    {
        healthText += "<color=red>♥</color>";
    }
    for (int j = 0; j < deathCounter; j++)
    {
        healthText += "<color=grey>♥</color>";
    }
    string pointsText = "\n      Points: " + points;
    string damageText = "\n Times Hit: " + damagedCount;

    string rAbilityText = "";
    if (hasAbility["GreenWall"] || hasAbility["RedWall"] || hasAbility["BlueWall"])
    {
        rAbilityText = "\nR Abilities: ";
    }
    rAbilityText += hasAbility["GreenWall"] ? "<color=green>■ </color>" : "";
    rAbilityText += hasAbility["RedWall"] ? "<color=red>■ </color>" : "";
    rAbilityText += hasAbility["BlueWall"] ? "<color=blue>■ </color>" : "";

    string tAbilityText = "";
    if (hasAbility["GreenTeleport"] || hasAbility["RedTeleport"] || hasAbility["BlueTeleport"])
    {
        tAbilityText = "\n T Abilities: ";
    }
    tAbilityText += hasAbility["GreenTeleport"] ? "<color=green>● </color>" : "";
    tAbilityText += hasAbility["RedTeleport"] ? "<color=red>● </color>" : "";
    tAbilityText += hasAbility["BlueTeleport"] ? "<color=blue>● </color>" : "";

    textComponent.text = healthText
                        + pointsText
                        + damageText
                        + "\n"
                        + rAbilityText
                        + tAbilityText;
}
Figure 7: Update Overlay Method
The first line was the health line, the red hearts equating to the damage the player can still take, and the grey hearts equating to the red hearts lost from the maximum amount. I did decide to actually change the health to 5 in the end. My compromise was that the health consumables would only give 1 health back, 2 in the level or 3 back from a bigger enemy, not totally restore health.
The second line was the points, which would be added to when defeating the enemy. I added this in the enemy script:
                int scale = Mathf.RoundToInt(gameObject.transform.localScale.x);

                if (obj != null && gameObject != null)
                {
                    scale = scale == 2 ? 3 : scale;
                    Destroy(gameObject);
                    if (enemyColor.g == 1)
                    {
                        playerScript.points += 100 * scale;
                    }
                    if (enemyColor.r == 1)
                    {
                        playerScript.points += 300 * scale;
                    }
                    if (enemyColor.b == 1)
                    {
                        playerScript.points += 600 * scale;
                    }
                    playerScript.UpdateOverlay();
                }
Figure 8: Points after defeating enemies code.
It just varies based on the enemy colour and size for now.
The third and fourth lines were the ability collectibles. I wasn’t able to find decent green/red/blue symbols, but luckily I discovered you could use rich text and color tags to colour the symbols, so all I had to do was find a square and circle symbol.
I made sure to call the UpdateOverlay in all the necessary places and it now worked! But there were still 3 problems.
When building the game for WebGL, the symbols wouldn’t display because I think chrome’s default font is not arial, which I based it around. It took me a while to find out the solution, but using this information from the Unity Community Forums, and a lot of testing, I realized I needed to include the arial font file in my assets and also call it in the script, to change the font.
The second issue was that it was hard to read my overlay. I had moved it closer to the centre, but it looked awkward. I booted up the Christian Whitehead Sonic the Hedgehog mobile port and realized my text wasn’t big enough. It had to be very big. Once it was very big, I could move it over to the corner and it could be read fine.
The third problem was that at the start, there were no abilities, so the lines weren’t included for that, but the background was still big. I had to work out what properties I needed to alter for it to adjust appropriately. I had to anchor the rect transform to (0, 1) also (top-left corner), otherwise it’d move when switching between maximized.
With all that considered, I stored the original size delta, which would I restore at the beginning of the method, and then subtract the appropriate height if none of the move-through-wall or teleport abilities were collected.
Finally, I had a great looking (relatively speaking) overlay!
Figure 9: Playthrough demonstrating the health and points overlay in my Unity Project.
Next week will be the final week of post-production. It will be time to do the final blue enemy layer, and some other final improvements, before looking back at the project.
