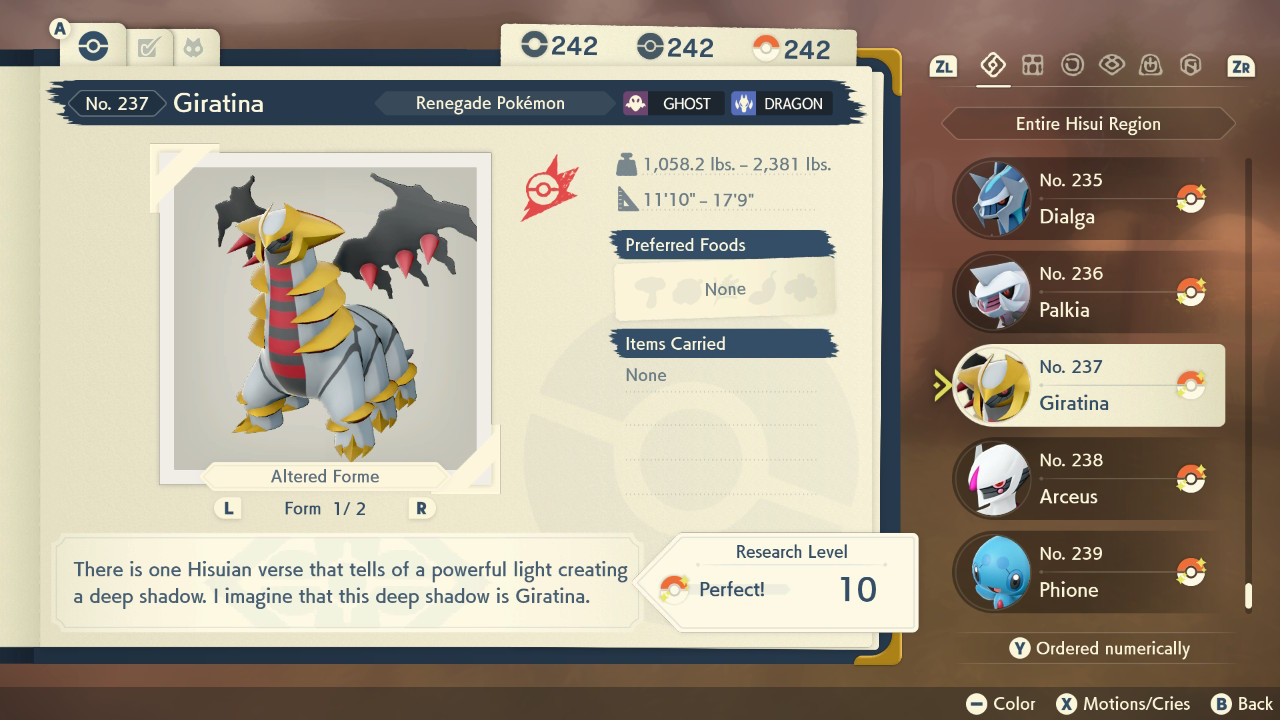
A brief progress update. I realized that the shiny Giratina I had transferred from GO a while ago was in fact the maximum size possible for Giratina in PLA, a pseudo-alpha. Once I realized that, I began thinking about how I could get a minimum size one, an omega.
I had seen information about Pokémon from previous generations being the minimum size when transferred to PLA, and once I began holding that thought, the Sinjoh Ruins event popped up in my mind. Not only did I have a chance of getting a minimum sized Giratina, but it could also be level 1!
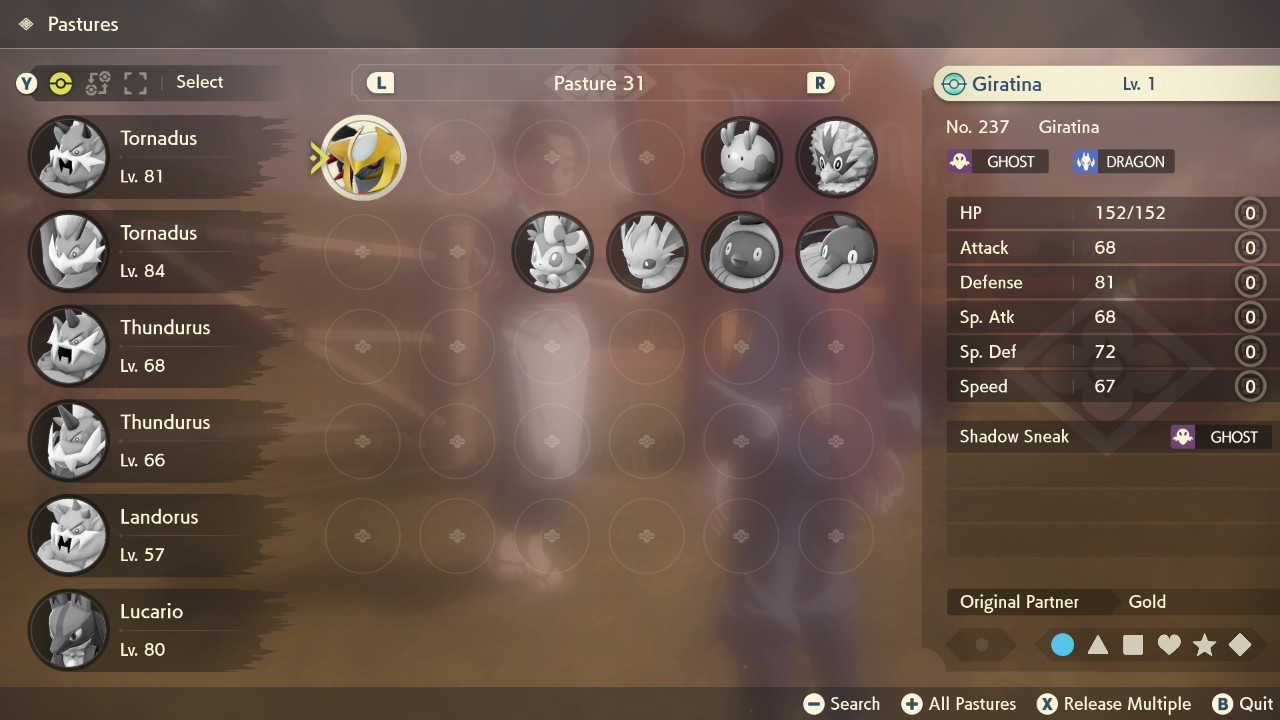
I quickly began looking on the GTS, to see if I could get one. At first, the Pokémon they requested in exchange for a level 1 Giratina were impossible for me to get. I didn’t stop looking though, and after several hours, Zacian was requested, something I could easily obtain back. I rushed to trade and finally I had a Sinjoh Ruins Giratina in my hands. Next, I transferred into Pokémon Legends Arceus, and checked its dimensions. It was indeed a minimum sized Giratina. Remarkably, it also had only 1 move, and 0 effort levels all around. It was minimal in every respect.
Not only did I have living minimum and maximum specimens, but the other part of the Pokédex entry for Giratina was complete: perfect height and weight ranges! I also decided to buy every move for my level 100 Giratinas (one of them being the maximum one). The only thing I haven’t done yet now, is mastered the moves for all of them.
I guess the next update might be mastering all the moves for my maximum Giratina (and the other maxed out ones) now.
Following on from my 999 for Shadow Claw, I gradually 999ed the other move-related research tasks for Giratina.
Maximising Number caught was an interesting challenge though. The only way I believe it can be incremented past 1 is to receive a Giratina from a trade. Luckily, I already had another switch and an alt account, that’s in French/Metric to show off maximum and minimum sizes.
I had to buy another copy of PLA though, so I could trade Giratina back and forth. A trade takes roughly 50 seconds, so it’s over 13 hours in total to do 1000 of them. I split them into 20 periods of 40 minutes each so I didn’t get too fed up, and watched anime at the same time I was pressing the buttons.
I finally achieved the final 999 today!
As for other progress, I’ve got 211 (13 to go) alpha species and 300 (23 to go) alpha forms; 103 shiny species and 120 shiny forms; 3 of my shinies are exclusively alpha, while I have 6 others in alpha and non-alpha.
I have 64 perfect entries and have still only completed 35 paths of solitude. I now have 19 species, 27 forms (I believe the last post counted a shiny by mistake) and 33 variants (including shinies) maxed out in total.
My next post will either be completed alpha or perfect Dex.
For my final week of post-production, I started with making it so that the enemy would have to be in camera before it moves, since the red enemies were all stuck to the wall before I got there.
I had already done the check in the teleport code. It was just a case of copying it, and testing it. I changed the upper limit to 1.2 to make them see the player a bit beyond the camera view.
Figure 2: In-camera view demonstration
Next, I thought a lot about how the blue layer part was going to go down. I had this idea that the enemies would be trapped behind walls as you go past them, and then you’d face the final boss. I even considered making the player sprites trapped in these walls, to make it look the final boss was imprisoning them.
Instead, I decided to make the blue move-through-wall ability out in the open and upon collecting it, it’d release lots of big enemies. These enemies would be of scale 4, bigger than all the rest, 5 of them red and one of them blue (which had more HP and stronger attacks). So it would be a great challenge unless you used the new broken attack I decided to pair up with the blue ability upon pressing E!
Basically, the player fires out of every one of its vertices 5 times. It took quite a bit of trial and error to work out the correct rotations and vectors to use, but suddenly when I used AngleAxis, everything started to work!
Figure 4: The E-Attack and the Blue Enemy Layer
For the walls that would disappear, I gave them a different tag, and then accessed the deactivate method I made in the Game Manager to loop through all the walls and set them as inactive game objects.
I also made another teleport point, this time with typing “3” and the new co-ordinates.
Figure 5: The Final Bird’s-eye view of the level.
Finally, with the blue teleport ability acquired, it was time to design the final boss. Initially I made it size 5 and tried to make it have an attack come out of every one of its vertices. I didn’t really have enough time to figure out the attack, so I went with it using a similar attack to E coming out the single point, and left in the ability for it to fire when it does the spinning block, as it produced a cool wave effect. I varied the speeds of both the spin attack and non-spin attack to get the right stength in each.
As you may have seen, I also changed the enemy update code, so that a certain number of attacks decrease them in size repeatedly, not just once. The boss fight was too easy at scale 5 if the E Attack is used, so I set it to scale 7.
Upon defeating the boss, I made it spawn a yellow ability collectible, which would take you to the game win screen. I also made another checkpoint to reach the boss.
Figure 8: Final Boss
With the development completed, I feel satisfied. There’s lots of more I could have done to make it more engaging, and look better visually, but it takes time. This was my first time on Unity. I’m sure I can accomplish more next time with the Unity engine knowledge I’ve acquired.
I also played it very safe with coding this time, because I was learning C# and the engine; perhaps I could try to master the arctan2-related maths next time and not just do the odd line with trial and error.
Figure 9: Post-Production Summary Video
Finally, I put together my video presentation. That’s all for this project!
During Week 11, I completed the red enemy layer of the level as well as introduced a screen overlay.
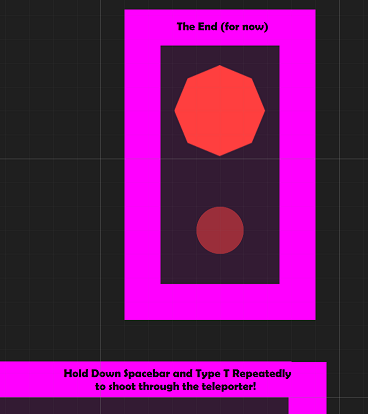
Figure 1: End (Teleport Area) of Red Enemy Layer in my Project in Unity.
First, off I worked on the far right side of the red enemy layer, past the three big green enemies. I wanted to introduce an interesting mechanic, the ability to teleport shooting. The idea is the enemy will move toward the player and cover the teleport zone. Then it’s a case of holding down spacebar and firing with T. Logically, you’d probably be pressing them simultaneously, but that’d make the code a bit more awkward to detect the correct response. Since I had the teleport set to pressing down T, I just added the extra condition like so:
The code prior to this was just transform.position = teleporterLocation; so it was a case of surrounding this statement with this alternative, and triggering the fire method in the AttackScript. One thing to note is the player position had to be substracted (transform.position) to nullify things because the formula in the attack script adds the player position.
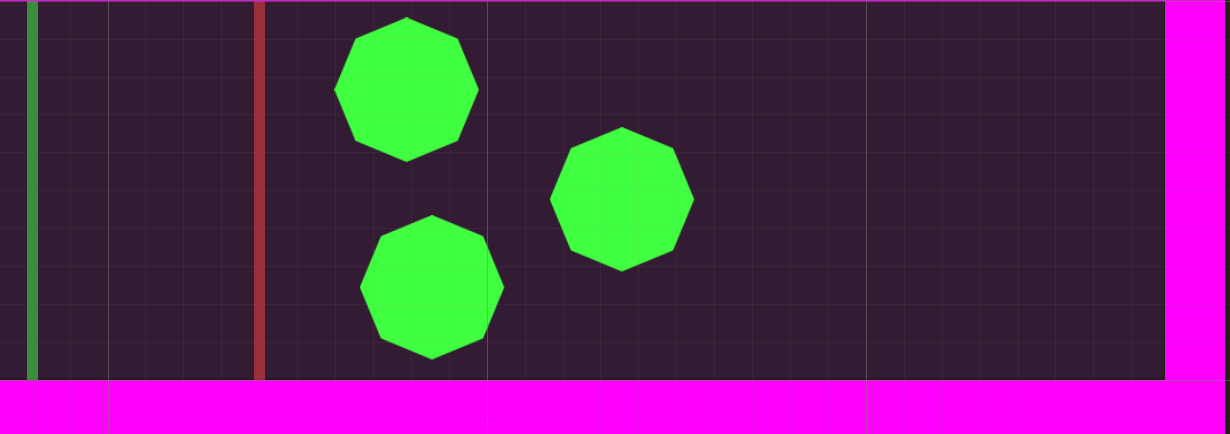
Figure 3: Teleporter Shooting in the Green Teleporter.
Even though the red teleporter forces you to use the mechanic, the green teleporter is actually a better demonstration because it has more space around it.
Next, I worked on implementing a checkpoint for the start of the red enemy layer. I just wanted a different button combination to allow you to restart at the new location. After a lot of trying, I learnt that the scripts would all just reload when reloading the scene, so I settled for pressing down a key at the very start of the level, giving a second to press it. If the player missed that second, they could just restart again, so it wouldn’t be much trouble.
I constructed this code, most of it just reloading the data I want, and the main things being the keycode check and the teleporting to the start of the red layer. restartTime is initalized in the start event.
After this, I worked on the blocking mechanic. I thought through different ways it could work, including increasing/darkness brightness, but I came to the conclusion the most effective way would be a rotation in the z-axis (constraining to the x-y plane). Because both player and enemy are pointy shapes, it gives a nice circular-saw-like effect with a fast rotation.
Figure 5: Blocking demonstration in my Unity project.
The logic was fairly straightforward, it was just a case of tweaking the time the block and the rotation was active for. While the block (boolean) was on, the player or enemy couldn’t take damage. I also made a timer count down, which at a certain point, would turn the block off; but it would also count down until the next availability of the block. Red Enemies and Blue Enemies would just use the block whenever they can, while Green Enemies couldn’t use it at all. The only problem I really had is that I checked for the inverse boolean by mistake in the player/enemy damage code. Once I realized what I had done, it worked as expected.
The final thing I developed this week was the long-awaited health and points overlay. I went back to try and figure out what to do. Luckily, I actually worked out what to do in not much time. I set an image as a child object of the canvas object and realized if I varied the position and size for the rect transform, it did actually cover the screen where I wanted when I went into play mode. The overlay didn’t look nice opaque, so I made it black but with a decent amount of transparency, close in colour to the dark floor.
For the text object, I just copied the position and dimensions that I had with the image. It seemed to work great, now I could start with whatever text I wanted. But I also wanted to edit it as updates happen throughout the game: when an enemy is defeated, when an ability is collected and when consuming health.
This information from the Unity Answers forum helped me. I needed to include UnityEngine.UI and get the Text component. Then I could just make a method to fill the text with whatever I wanted.
The first line was the health line, the red hearts equating to the damage the player can still take, and the grey hearts equating to the red hearts lost from the maximum amount. I did decide to actually change the health to 5 in the end. My compromise was that the health consumables would only give 1 health back, 2 in the level or 3 back from a bigger enemy, not totally restore health.
The second line was the points, which would be added to when defeating the enemy. I added this in the enemy script:
It just varies based on the enemy colour and size for now.
The third and fourth lines were the ability collectibles. I wasn’t able to find decent green/red/blue symbols, but luckily I discovered you could use rich text and color tags to colour the symbols, so all I had to do was find a square and circle symbol.
I made sure to call the UpdateOverlay in all the necessary places and it now worked! But there were still 3 problems.
When building the game for WebGL, the symbols wouldn’t display because I think chrome’s default font is not arial, which I based it around. It took me a while to find out the solution, but using this information from the Unity Community Forums, and a lot of testing, I realized I needed to include the arial font file in my assets and also call it in the script, to change the font.
The second issue was that it was hard to read my overlay. I had moved it closer to the centre, but it looked awkward. I booted up the Christian Whitehead Sonic the Hedgehog mobile port and realized my text wasn’t big enough. It had to be very big. Once it was very big, I could move it over to the corner and it could be read fine.
The third problem was that at the start, there were no abilities, so the lines weren’t included for that, but the background was still big. I had to work out what properties I needed to alter for it to adjust appropriately. I had to anchor the rect transform to (0, 1) also (top-left corner), otherwise it’d move when switching between maximized.
With all that considered, I stored the original size delta, which would I restore at the beginning of the method, and then subtract the appropriate height if none of the move-through-wall or teleport abilities were collected.
Finally, I had a great looking (relatively speaking) overlay!
Figure 9: Playthrough demonstrating the health and points overlay in my Unity Project.
Next week will be the final week of post-production. It will be time to do the final blue enemy layer, and some other final improvements, before looking back at the project.
For week 10, I asked 4 peers who are interested in game development the following couple of questions, as well as suggesting they could give any other feedback:
Q1. What should I prioritise developing next (can rank)?

Option A) Player Health / Points Overlay

Option B) Sound Effects

Option C) More Level (introduction to other enemy colours and scenarios)

Option D) Anything else, such as laying mines

Q2. Is there any small tweaks like speed or colouring you think could be changed?
Figure 1: My short questionnaire.
From the feedback I got, the two winning suggestions were: to focus on making more of the level; and making the player and health points overlay. There was little support for adding sound effects; but some support for powerups, such as laying mines.
Aside from providing a good means of prioritising my features to implement via a consensus, the participants also brought up some of the harder to solve issues:
● What to do when both enemy and player are trying to go through the wall. It’ll block one of them, but allow one of them to go through. When it allows one to go through, the sprite renderer is turned off though, so it’s invisible. So essentially one will be colliding with an invisible wall.
● What to do about the bullets going through walls.
Ideally I’d want part of the wall to go invisible for the first issue; but without me exploring solutions for the issue, it sounds complex to me. For the second issue, I’ve found it hard to block bullets, perhaps because of their speed.
One participant actually found a bug that I’d never encountered before, which I was very pleased about. It had to do with a blue enemy leaking through the wall when the game was switched between any of focused, unfocused and maximized modes.
I went onto fix this bug fairly quickly by making the walls quicker, and it is on my radar to try to fix similar bugs to these from now on.
One of the other issues people had was with the lack of health also. There was a minor bug due to some boolean arithmetic going wrong, which meant that there was a pause in damage that was missing when colliding with bullets. The first enemies were also lacking any health consumables spawning from them, so I changed the code so that all enemies spawn the health, and any collectible abilities also restore health. I tried upping the health a bit also, but it changed my vision for the opening part of the level, so I went against the idea in the end. Hopefully the other changes I’ve made have helped, but I am aware of the issue and am thinking about it a lot as I design more of the level.
Given the support for wanting to see more of the level, I started on making the second layer of the level, where combat with the 2nd ranked enemy, the red enemy, is introduced.
I also went through the checklist of features my lecturer wanted to see, and one of the remaining features from there was an attack-blocking mechanic. That missing mechanic was planned to be introduced by the red enemies, so it was a convenient target for this week’s development.
Figure 2: Left-side of second layer of the level in my Unity project.
To begin with my level expansion, I just built a horizontal rectangle on top of the tunnel going upwards from where the set of teleporters where. As I was putting the walls down, I was thinking about how to design this part of the level.
My initial idea was to have a red wall to the right, which you’d gain access by defeating the red enemies to the left and perhaps a teleporter to the top which you’d gain access to after defeating the enemies to the right. I wanted something to happen near the teleporter though, which didn’t really give me enough to space to work based on what you can see above. I didn’t really have many ideas for the right space, so it made sense to have that teleporter interaction there.
As for my enemies, I went with a similar structure to the first part of my level: three smaller enemies and one bigger enemy. At first, I wanted the big enemy to spawn the move-though-wall collectible; but one problem was that I initially placed the red wall to the right (would later put a green wall before it) and so it could have escaped to the right; the other problem is that it’d make the fight very difficult. Red enemies are stronger in both health and attack power, and lacking the red ability to match the damage would draw out the fight too long. Not only that, I planned to implement blocking also, which would make it even harder.
In the end, I went with placing the collectible behind the enemies, so the idea was the player would could move in and collect the ability, and then faced the enemies behind. Upon defeating them, the big red enemy would spawn the teleport ability.
Figure 3: Left-side of second layer of the level in my Unity project.
To round up the focus on the level design, I placed a green wall before the red wall on the right so that the red enemies couldn’t use the red wall to slide down and outside of where they are supposed to be. I tried thicker walls, but I couldn’t get it to work without disrupting the rest of the level.
Finally, the right section consisted of three big green enemies, which would act as a showcase of the new-found power of the red bullets. They now die in half the time. When you become red, your speed also gets increased relative to green.
For coding this week, the biggest challenge was adapting all the code to work with green and blue enemies. For instance you can see here that I generalized the spawning of the Teleport ability collectible:
Figure 4: Teleport Ability Clone Spawning code for all 3 colours.
I also had to adapt the speed and attack power depending on the colours, and also for the player’s changing of colours. On top of that, the additional red and blue objects interactions with the coloured walls had to be accounted for, as well as the enemy’s bullets also having to change colours from the default green. It was a lot of minor changes to test.
One interesting bug I fixed was where: the bullets would get destroyed, but still leave the coloured wall they were going through invisible. I fixed it with this code: gameObject being the bullet and render being the sprite renderer of the wall:
    if (gameObject.activeSelf)
    {
        StartCoroutine(ReturnVisibility(obj));
    }
}

IEnumerator ReturnVisibility(GameObject obj)
{
    yield return new WaitForSeconds(0.6f);
    if (obj == null)
    {
        render.enabled = true;
    }
}
Figure 5: ReturnVisibility Co-routine.
Next week, I’ll explore the attack-blocking mechanic, checkpoints, the red teleport area and a Health / Points overlay.
In week 9, the final week of production, I aimed to implement the final set of mechanics that’d make something that could be realistically considered a game: shooting and health/damage for both player and enemy. I decided to make an attack script that would contain the partitioned code for both player and enemy attacks. The damage would meanwhile reside in the player and enemy scripts at the bottom for now.
So to start off with, I took the code from this page of the Unity Answers forum:
 void Fire()
 {
 Rigidbody bulletClone = (Rigidbody) Instantiate(bullet, transform.position, transform.rotation);
 bulletClone.velocity = transform.forward * bulletSpeed;
 // You can also acccess other components / scripts of the clone
 //rocketClone.GetComponent<MyRocketScript>().DoSomething();
 }


 // Use this for initialization
 void Start () {

 }

 // Update is called once per frame
 void Update () {
     if (Input.GetButtonDown("Fire1"))
         Fire();

 }
It provided the basic mechanics for shooting. The two notable changes I had to do to get it working was adapt to 2D (RigidBody2D) and apply a rotation (transform.forward becoming Quaternion.Euler(0,0,90) * transform.right). Since I had zero experience in geometric-based scripting, it was really a case of trial and error to find the correct code. I understand the “right” part refers to the x-axis though, with “up” and “forward” referring to the y and z axes respectively.
I started writing the enemy shooting in a separate function, before deciding to combine them into one function that would mostly include the differences within the arguments. Although this approach definitely helped my understanding in the end, it perhaps made it harder to debug, since I had to understand the differences between the enemy and player code and make sure both work.
After two challenging days of tackling the problem, I eventually made the enemy fire from eight different points in the direction of where the player was. It was challenging to constrain the angles and make sure the co-domain (set of destination) values were not defined by looking 180 degrees either way, and instead a full 360 degrees.
using System.Collections;
using System.Collections.Generic;
using UnityEngine;

public class AttackScript : MonoBehaviour
{
    public Rigidbody2D bullet;
    private PlayerScript playerScript;
    private EnemyScript enemyScript;
    public float waitTime = 0;
    private int waitCount = 0, waitPoint = 3;

    void Start()
    {
        playerScript = FindObjectOfType<PlayerScript>();
        enemyScript = FindObjectOfType<EnemyScript>();
        waitTime = Random.Range(0f, 2f);
    }

    // Update is called once per frame.
    void Update()
    {
        if (Input.GetKeyDown(KeyCode.Space) && gameObject.CompareTag("Player"))
        {
            Fire("Player", playerScript.runSpeed * 5, Vector2.zero, Quaternion.identity, 0.3f, 1);
        }
        if (gameObject.CompareTag("Enemy") && bullet != null)
        {
            // Assigns distance, scale and direction variables.

            float distance = Vector2.Distance(transform.position, playerScript.transform.position);
            float scale = transform.localScale.x;
            Vector2 direction = (playerScript.transform.position) - this.transform.position;

            if (distance < scale*6)
            {

                // Increments the enemy wait time.

                waitTime += Time.deltaTime;
                waitCount = Mathf.RoundToInt(waitTime);

                // Constrains the angle to pi/4 radians (i.e. to the 8 vertices of an octagon) and positions/rotates the bullets accordingly.

                float angle = Mathf.Atan2(direction.y, direction.x);
                float constrainedAngle = Mathf.RoundToInt(angle / (Mathf.PI / 4f)) * (Mathf.PI / 4f);
                Vector3 position = new Vector3(Mathf.Cos(constrainedAngle), Mathf.Sin(constrainedAngle), 0);
                Quaternion rotation = Quaternion.LookRotation(Vector3.forward, position);

                Fire("Enemy", enemyScript.runSpeed * 5, position, rotation, 0.5f, scale);
            }
        }
    }

    void Fire(string side, float bulletSpeed, Vector3 positionModifier, Quaternion rotationModifier, float expiry, float scale)
    {
        if (playerScript.activeColor != playerScript.colorWhite && (side != "Enemy" || waitCount >= waitPoint))
        {

            // Launch bullet.

            Rigidbody2D bulletClone = Instantiate(bullet, transform.position + positionModifier, rotationModifier * Quaternion.Euler(0, 0, 90) * transform.rotation);
            bulletClone.velocity = rotationModifier * Quaternion.Euler(0,0,90) * transform.right * bulletSpeed;

            // Destroy the bullet after a fixed amount of time.

            Destroy(bulletClone.gameObject, expiry*Mathf.Sqrt(scale));

            // Reset enemy wait.

            waitTime = Random.Range(0f, 2f);
            waitCount = 0;
        }
        else if (side == "Player")
        {
            StartCoroutine(playerScript.Flicker(playerScript.gameObject));
        }
    }
}
Figure 2: My attack script.
In my finalized script, you can additionally see RNG determining when the enemy fires, as well as bullet speed and scale modifiers.
Figure 3: Demonstration of the firing of bullets in my Unity project.
It’s worth pointing out that I modified my hexagon enemy shape into an octagon, so it would fire in the 8 (primary and secondary) compass directions. A standard hexagon by comparison could not fire from both the side and the top/bottom. It was around this time, that I also made the level space larger, to more easily navigate around the enemies as a player. I also made the enemy bullets appear darker.
The complementing part to the attacks is the damage dealt. To take multiple hits without dying, there also needs to be health points. This part was more of a case of just figuring out the precise logic I wanted rather than looking up Unity functions.
    if (obj.CompareTag("Bullet") && obj.layer == LayerMask.NameToLayer("Player Bullet"))
    {
        deathCounter++;

        if (obj != null && gameObject != null)
        {
            StartCoroutine(playerScript.Flicker(gameObject));
        }

        if (deathCounter == deathPoint)
        {
            if (obj != null && gameObject != null)
            {
                Destroy(gameObject);
            }
        }
Figure 4: Enemy Damage Code
For the enemy damage, the enemy would simply flicker if it got damaged but was still alive, and if the counter reached its “deathPoint”, basically its amount of health, the enemy game object would be destroyed. I also added the following code:
        if (deathCounter > 20)
        {
            transform.localScale = new Vector3(2, 2, 1);
            transform.position = Vector2.MoveTowards(this.transform.position, Player.transform.position, -runSpeed * Time.deltaTime);
        }
Figure 5: Enemy Shrink and Retreat Code
Essentially big enemies have bigger health, if they get hit 20 times, it shrinks and then moves away from the player instead of towards the player.
The player damage was a bit trickier to implement. I wanted the player to change to the white mode if it had 1 health left, which additionally complicated things.
Since I wanted different behaviour on each hit, with simple instructions, it was a good time to use a switch statement. On the first hit, I just wanted it the player to flicker orange; on the second hit, I wanted it to flicker orange and revert to the white mode; on the final hit, I wanted game over to trigger.
I also implemented a temporary pausing of damage after getting hit. Getting the pausing and flickering to work was quite difficult, but eventually I found that the InvokeRepeating function did what I wanted. It would allow me to call the flickering/pausing function in a time intervals. I could then CancelInvoke when I was done.
Finally, I made Health consumables which would restore health upon the player colliding with them.
Figure 7: Player Damage demonstration in my Unity project.
Additionally I cleaned up the Game Manager script, by making repeated loops that deactivate objects into one function when the Game Over function is called.
void Deactivate(string tagName)
{
    GameObject[] gameObjects = tagName != "Others" ? GameObject.FindGameObjectsWithTag(tagName) : findOthers;
    {
        foreach (GameObject i in gameObjects)
        {
            if (i != null)
            {
                i.SetActive(false);
            }
        }
    }
}
Figure 8: Custom Deactivation Method
The function takes a tag name argument, unless it’s labelled “Others”. “Others” is an array of single game objects to loop through that’s identified earlier in the code. Otherwise, it just loops through the game objects with the tag, and deactivates them.
That now concludes the production. It was a long and hard effort, but I’m fairly satisified with the results.
Figure 9: Production Summary Video
Next week I’ll go into Post-Production, looking at getting feedback from users to determine my course of action.
For week 8, I started making walls to obstruct the enemy and add more detail to the scene. Thinking back to the plan, I also wanted the player to be safe while in ‘white mode’, so I constructed a white wall, where no enemies could pass. This white wall would be a vertical inner wall, while the outer walls would be magenta, to distinguish them from the Green, Red and Blue enemies. The background or outer floor was a dark grey, while the inner floor was a bit lighter with magenta mixed in.
Figure 1: An approximate recreation of my initial level design in Unity.
As for the ability of the white character to move through white walls (both of which actually look grey), I googled and looked into disabling the sprite renderer of the wall while entering its collider, and re-enabling it while exiting its collider. It took a lot of figuring out for what to do next, but eventually I settled for turning the player collider trigger on when going through the same coloured walls. I found an example of the correct code on the Unity forums. This behaviour would be same for the enemies too.
So to summarize the mechanics, the sprite renderer of the wall gets turned off in the OnCollisionEnter2D event, and gets turned on in the OnTriggerExit2D event. The opposite happens with the collider triggers for the objects entering/exiting the walls, as they get turned on when entering and get turned off when exiting.
I also updated the player sprite in preparation for when I implement shooting, my chosen type of attack.
Figure 3: Passing through walls in my project in Unity.
For the next stage, I wanted to pass instructions to the player on how to play the game. I spent hours trying to work out how I could overlay additional text on the screen like I did with Game Over but while actually playing the game. I couldn’t figure it out, so I settled for a decent alternative: I would save images with the text on them and seemlessly add them onto the walls as separate game objects that I can gradually enable on the screen.
Figure 4: The starting message for my project in Unity.
The other main ability I wanted the player to have was teleporting. Reflecting on the mechanics, I wanted a script to find a teleport location within camera view that corresponded to the player colour. It was relatively simple to get working in its most basic form, since you just reassign the value for the position attribute of the player object on pressing the trigger button (T in this case). It gets a bit complicated when you add in the checks, such as finding a teleporter object in camera view, which requires looping through all teleporters and then checking the co-ordinates don’t exceed the camera area.
I also wanted one side of the teleporter to be visible and the other side not. A bug quickly arose where it would cycle through on-off, off-on, off-off, on-on states. I had to think through making a check that always treated the teleporter objects in pairs, so if one was on, the other one was off. It was an interesting challenge.
using System.Collections;
using System.Collections.Generic;
using UnityEngine;

public class TeleportScript : MonoBehaviour
{
    // Declare variables.

    public Camera mainCamera;
    private GameObject player;
    private PlayerScript playerScript;
    [SerializeField] private GameObject bigGreenEnemy;
    private bool hasSpawned = false;

    // Assign variables.

    void Start ()
    {
        player = GameObject.Find("Player");
        playerScript = player.GetComponent<PlayerScript>();
    }

    void Update ()
    {

        // Upon pressing down T, finds the nearest visible teleport point, and teleports to it. After, it disables the forward teleport circle and reveals the backward one.

        if (Input.GetKeyDown(KeyCode.T))
        {
            GameObject[] teleporters = GameObject.FindGameObjectsWithTag("Teleporter");
            SpriteRenderer spriteRenderer1 = null;
            SpriteRenderer spriteRenderer2 = null;
            Vector3 teleporterLocation = new Vector3(0,0,0);

            foreach (GameObject teleporter in teleporters)
            {
                bool whiteCheck = player.layer == LayerMask.NameToLayer("IgnorePlayer") && teleporter.layer == LayerMask.NameToLayer("White Teleporter");
                bool greenCheck = player.layer == LayerMask.NameToLayer("Player") && teleporter.layer == LayerMask.NameToLayer("Green Teleporter") && playerScript.hasAbility["GreenTeleport"];
                if (whiteCheck || greenCheck)
                {
                    Vector3 targetPosition = mainCamera.WorldToViewportPoint(teleporter.transform.position);

                    if (targetPosition.x >= 0 && targetPosition.x <= 1 && targetPosition.y >= 0 && targetPosition.y <= 1)
                    {

                        SpriteRenderer spriteRenderer = teleporter.GetComponent<SpriteRenderer>();

                        if (spriteRenderer.enabled)
                        {
                            teleporterLocation = teleporter.transform.position;
                            spriteRenderer1 = spriteRenderer;
                        }
                        else
                        {
                            spriteRenderer2 = spriteRenderer;
                        }
                    }
                }
            }
            if (spriteRenderer1 != null && spriteRenderer2 != null && !teleporterLocation.Equals(default))
            {
                transform.position = teleporterLocation;
                spriteRenderer1.enabled = false;
                spriteRenderer2.enabled = true;
            }
            else
            {
                StartCoroutine(playerScript.Flicker(player));
            }
        }
    }
}
Figure 5: Teleport Script.
I added a dictionary to the player script that would maintain the abilities the player has, such as the teleport ability, and also made the player flicker when the teleport ability was unable to be used. At the same time, I did this for the case of when a player isn’t allowed to change colour while moving through walls.
Figure 6: Teleporting demonstration in my Unity project.
The final feature this week I was thinking about was how the mechanic of collecting abilities would work. I settled on having game objects that would rotate through the y-axis and once the player collided with them, the objects would essentially disappear and the player would now possess the ability. I also had lots of thoughts back and forth on the logic of where things should be positioned.
Figure 7: Rotation code for the Collectible script.
The outcome of my thoughts was that the player would start in the safe, white mode, where enemies couldn’t hurt it, then pick up the green move-through-wall ability to the left, which would then make the player go into the green mode. When in the green mode, the player could attack and be attacked. Upon defeating a big green enemy, it could collect the green teleport ability, which would then allow it to teleport to the second part of the level.
Figure 8: Collectible ability code in the Player script.
My plan would be that you always collect the move-through-wall ability before collecting the teleport ability.
Figure 9: Collecting Abilities demonstration in my Unity project.
Next week, I will go over implementing shooting and damage mechanics, making some custom methods to make the code look cleaner, and finally, summarising my production so far.
In Week 7, I started looking for an example of an enemy script. I struggled a little on what to search for. Luckily, our Lecturer suggested a couple of phrases for me to try out. In his second suggested search, I found an ideal enemy tutorial:
It took a while to get working, but eventually the enemies were moving towards the player, just like in the tutorial. It was then a case of implementing my idea of having different speeds for different colours. I was surprised at quickly I got this to work; due to the script being attached to each enemy, all I had to do was find the colour of the enemy, and change a single variable in the enemy movement code. The result was that different coloured enemies were moving at different speeds.
Figure 2: Enemies Approaching the Player in my Unity Project.
The hardest thing to do was to actually come up with a tidy calculation that would determine the speed based on the RGB values of the enemy. Fortunately, I found a simple solution. The RGB values had either Green, Red, or Blue set to 1, so all I had to do was a simple scalar product to assign them to the correct speeds. I wasn’t sure what the product would look like, so I did some testing on notepad first.
After some trial and error, I realised [3, 2, 1] worked if I just floored all the RGB values within the colours first.
My colours were [1, 0.25, 0.25], [0.25, 1, 0.25] and [0.25, 0.25, 1] for Red, Green and Blue, respectively.
0.25 floors to 0, and 1 floors to 1, so the resulting vectors are [1,0,0], [0,1,0] and [0,0,1].
For each of the resulting vectors, we then cross-multiply with [3, 2, 1] and sum the results, obtaining 3 for Red, 2 for Green and 1 for Blue. It’s then just a case of pairing the correct speeds with those outputs.
I also made sure the enemy stops moving towards a player that is white.
using System.Collections;
using System.Collections.Generic;
using UnityEngine;

public class EnemyScript : MonoBehaviour
{
    // Declare Enemy Physics/Movement Variables

    public GameObject Player;
    private Color enemyColor;
    private float calcColor;
    private float runSpeed;
    private Dictionary<float, float> enemyID = new Dictionary<float, float>();
    private float distance;
    private PlayerScript playerScript;

    void Start()
    {
        playerScript = FindObjectOfType<PlayerScript>();
        enemyColor = gameObject.GetComponent<SpriteRenderer>().color;
        calcColor = 3 * Mathf.Floor(enemyColor.r) + 2 * Mathf.Floor(enemyColor.g) + 1 * Mathf.Floor(enemyColor.b);
        enemyID = new Dictionary<float, float>
        {
            { 3, 3f },
            { 2, 2f },
            { 1, 4f },
        };
        enemyID.TryGetValue(calcColor, out runSpeed);
    }

    void Update()
    {
        if (playerScript.activeColor != playerScript.colorWhite)
        {
            distance = Vector2.Distance(transform.position, Player.transform.position);
            Vector2 direction = Player.transform.position - transform.position;

            transform.position = Vector2.MoveTowards(this.transform.position, Player.transform.position, runSpeed * Time.deltaTime);
        }
    }
}
Figure 3: Enemy Script
Next, I needed to make a collision event so I could trigger code (such as game over) when the player and enemy collide. I found it quite difficult to get it working. I needed to add colliders to both players and enemies, and add OnCollisionEnter2D(Collision2D collision) events. I added them in both player and enemy scripts. It still wouldn’t work.
void OnCollisionEnter2D(Collision2D collision)
{
    if (collision.gameObject.CompareTag("Enemy"))
    {

        // Game Over Event
        gameObject.SetActive(false);
        FindObjectOfType<GameManager>().GameOver();
    }
}
Figure 4: On Collision Event triggering Game Over.
One issue was I forgot the 2D part in the event, but the other thing was collision layers, which I eventually learned after googling. I found the Unity documentation on the subject; and then made sure the enemies were assigned with the enemy layer, and the player was assigned to the player layer.
Figure 4: Collision Layers
I made another layer for when it was white, which would not collide with the enemy, and adapted the player colour switching code to take that into account.
Figure 5: Collision with the Enemy triggering Game Over in my Unity Project.
Next week, I will look at implementing teleporting and conditionally moving through walls.
I ignored the player movement part, since that part was already done.
I followed the camera part of tutorial, and then googled various sites in order to adapt their script to 2D top-down. I eventually got the camera working with lots of testing.
using System.Collections;
using System.Collections.Generic;
using UnityEngine;

public class CameraScript : MonoBehaviour

   // Making a public variable for Player.

{
    public GameObject playerDiamond;

    private Vector3 offset;

    // Start is called before the first frame update.

    void Start()
    {
        offset = transform.position - playerDiamond.transform.position;
    }

    // Update is called once per frame.

    void LateUpdate()
    {
        // Make Camera match player's transform position.

        transform.position = playerDiamond.transform.position + offset;

    }
}
Figure 1: Camera Script that follows the player from overhead.
I changed playercube to playerDiamond, since it’s actually a diamond in my game, not a cube like in the tutorial’s. I also wasn’t sure if Vector2 should be used instead, but I think with my experimenting, keeping Vector3 made the code simpler.
Figure 2: Camera tracking the player in my Unity project.
The next stage in the tutorial was concerned with creating a game over screen. There were 3 steps involved: creating “Game Over” text that filled the screen; deactivating all the game objects for that screen; and constructing a way to reload the game.
There were numerous problems at every stage, but gradually I found solutions to the problems that came up. I think the tutorial was also slightly wrong, since it assigned a variable true, checked if it was true, and then assigned it to be true again inside the check. I could not see any other script that interacted with it, so I changed the first assignment to be false and then the check to look for false. The theory behind this is that it won’t execute more than once, which could possibly cause errors or slow down the execution depending on what code executed following the success of the check.
The tutorial showed me to put all the code inside a Game Manager script:
using System.Collections;
using System.Collections.Generic;
using UnityEngine;
using UnityEngine.SceneManagement;

 public class GameManager : MonoBehaviour
{
    bool gamehasEnded = false;

    public GameObject Floor;
    public GameObject GameOverPanel;
    public GameObject Player;

    public void GameOver()
    {
        if (!gamehasEnded)
        {
            gamehasEnded = true;

            foreach (GameObject enemy in enemies)
            {
                enemy.SetActive(false);
            }
            Floor.SetActive(false);
            GameOverPanel.SetActive(true);
        }
    }

    void Restart()
    {
        SceneManager.LoadScene(SceneManager.GetActiveScene().name);
    }

    void Update()
    {
        if (Input.GetKeyDown(KeyCode.Space))
        {
          Restart();
        }
    }
}
Figure 3: Game Manager Script.
I made the pressing down of the spacebar trigger restart, which just reloads the scene.
Figure 4: Game Over Screen in my Unity Project.
Next week, I’ll look at adding enemies and collision.
In week 5, I looked at a couple of in-program tutorials. The first was the Karting microgame. It helped familiarise me with the basic tools in Unity and how to publish a game. I also looked at the FPS microgame. It was also useful, this time teaching me more about moving the camera around in the scene view. While these tutorials were useful, they still didn’t really give me a good place to start.
Figure 1: Karting Microgame Preview (Unity 2023)
I asked a classmate where he started and he said he did player movement first, so I searched and found this tutorial (Stuart’s Pixel Games) on how to do simple 2D Top-Down movement. I copied the following code into a player script:
Figure 2: Player Movement Code (Stuart’s Pixel Games n.d.)
Once I put it in and attached it to a player game object with a rigid body, I noticed the player was drifting downwards. I simply had to zero the gravity value from the RigidBody2D and I now had basic movement.
Figure 3: Player Movement in my Project on Unity
For the final task this week, I decided to implement a feature that looked easy to do: changing colours with a key press. This is essentially broken down to a key press event, and then switching between multiple predetermined values. The two common ways to do the latter are either using a switch statement or going with a hash table approach, such as using key value pairs to determine the next value to switch to. I chose to do the latter as it looks tidier in my opinion and is something I’m more familiar with.
The Unity scripting reference API was useful in finding the information out. The pages GetKeyDown Event and Colors provide the information to create the function, while TutorialsTeacher provided information on C# dictionaries, which help with the organization.
    public Color activeColor;
    private SpriteRenderer render;
    private Dictionary<Color, Color> colorChange = new Dictionary<Color, Color>();
    public Color colorWhite = new Color(1f, 1f, 1f);
    private Color colorGreen = new Color(0.25f, 1f, 0.25f);
    private Color colorRed = new Color(1f, 0.25f, 0.25f);
    private Color colorBlue = new Color(0.25f, 0.25f, 1f);

 void Start()
    {
        ColorChangeSetUp();
    }


  void ColorChangeSetUp()
    {
        colorWhite.a = 0.75f;
        activeColor = colorWhite;
        render = GetComponent<SpriteRenderer>();
        colorChange = new Dictionary<Color, Color>
        {
            { colorWhite, colorGreen },
            { colorGreen, colorRed },
            { colorRed, colorBlue },
            { colorBlue, colorWhite }
        };
    }
    void Update()
    {
        if (Input.GetKeyDown(KeyCode.R))
        {
            if (colorChange.TryGetValue(activeColor, out Color newColor))
            {
                activeColor = newColor;
                render.color = newColor;
            }
        }
     }
Figure 4: Player Colour Switching Code
The tricky parts were trying to get the right colours to display. It took me a while to learn how to generate custom colours using the “new Color” constructor.
Figure 5: Player Color Switching in my Unity project.
Next week, I will look at making a very basic working game.